CC's Boat

一顾青山舟远去,归来仍是顾青山

0%

瑞吉外卖项目开发记录

1.写在最前

首先特别感谢黑马程序员提供的开源课程及项目https://www.bilibili.com/video/BV13a411q753

该项目的技术栈包括Spring, SpringMVC, MyBatis/MyBatis Plus, SpringBoot,MySQL,Redis, Maven, Git,适合作为SpringBoot框架学习的练手项目,感兴趣的朋友可以点击上述的链接进行学习。

博主也是刚学习完框架,写个项目练练手,会把项目中遇到了一些值得强调的点写在这里作为highlight。

2.环境搭建

首先建库建表,这块没什么好说的,黑马提供了sql脚本帮助建表,直接执行即可,注意执行过程中会发现utf8mb3_bin的字符集已经被废弃(https://dev.mysql.com/blog-archive/mysql-8-0-when-to-use-utf8mb3-over-utf8mb4/)所以可以更改相应的字符集设定,我这里偷懒没改。

然后在IDEA中创建相应的Maven工程,可以选择使用Maven模板创建或者使用Spring Initializar, 然后在pom中补充需要的依赖。

1
2
3
4
5
6
7
8
9
10
11
12
13
14
15
16
17
18
19
20
21
22
23
24
25
26
27
28
29
30
31
32
33
34
35
36
37
38
39
40
41
42
43
44
45
46
47
48
49
50
51
52
53
54
55
56
57
58
59
60
61
62
63
64
65
66
67
68
69
70
71
72
73
74
75
76
77
78
79
80
81
82
83
84
85
86
87
88
89
<?xml version="1.0" encoding="UTF-8"?>
<project xmlns="http://maven.apache.org/POM/4.0.0" xmlns:xsi="http://www.w3.org/2001/XMLSchema-instance"
xsi:schemaLocation="http://maven.apache.org/POM/4.0.0 https://maven.apache.org/xsd/maven-4.0.0.xsd">
<modelVersion>4.0.0</modelVersion>
<parent>
<groupId>org.springframework.boot</groupId>
<artifactId>spring-boot-starter-parent</artifactId>
<version>2.4.5</version>
<relativePath/> <!-- lookup parent from repository -->
</parent>

<groupId>fun.xinliu</groupId>
<artifactId>tiny_takeaway</artifactId>
<version>0.0.1-SNAPSHOT</version>

<properties>
<java.version>8</java.version>
</properties>

<dependencies>
<dependency>
<groupId>org.springframework.boot</groupId>
<artifactId>spring-boot-starter-web</artifactId>
</dependency>

<dependency>
<groupId>org.springframework.boot</groupId>
<artifactId>spring-boot-devtools</artifactId>
<scope>runtime</scope>
<optional>true</optional>
</dependency>

<dependency>
<groupId>mysql</groupId>
<artifactId>mysql-connector-java</artifactId>
<scope>runtime</scope>
</dependency>

<dependency>
<groupId>org.projectlombok</groupId>
<artifactId>lombok</artifactId>
<optional>true</optional>
</dependency>

<dependency>
<groupId>org.springframework.boot</groupId>
<artifactId>spring-boot-starter-test</artifactId>
<scope>test</scope>
</dependency>

<dependency>
<groupId>com.baomidou</groupId>
<artifactId>mybatis-plus-boot-starter</artifactId>
<version>3.4.2</version>
</dependency>


<dependency>
<groupId>com.alibaba</groupId>
<artifactId>fastjson</artifactId>
<version>1.2.76</version>
</dependency>

<dependency>
<groupId>com.alibaba</groupId>
<artifactId>druid-spring-boot-starter</artifactId>
<version>1.1.23</version>
</dependency>

</dependencies>

<build>
<plugins>
<plugin>
<groupId>org.springframework.boot</groupId>
<artifactId>spring-boot-maven-plugin</artifactId>
<configuration>
<excludes>
<exclude>
<groupId>org.projectlombok</groupId>
<artifactId>lombok</artifactId>
</exclude>
</excludes>
</configuration>
</plugin>
</plugins>
</build>

</project>

新建完项目后首先在application.yml中进行属性配置:

1
2
3
4
5
6
7
8
9
10
11
12
13
14
15
16
server:
port: 8088
spring:
datasource:
druid:
driver-class-name: com.mysql.cj.jdbc.Driver
url: jdbc:mysql://localhost:3306/takeaway_db?serverTimezone=Asia/Shanghai&useUnicode=true&characterEncoding=utf-8&zeroDateTimeBehavior=convertToNull&useSSL=false&allowPublicKeyRetrieval=true
username: root
password: cc417230
mybatis-plus:
configuration:
map-underscore-to-camel-case: true
log-impl: org.apache.ibatis.logging.stdout.StdOutImpl
global-config:
db-config:
id-type: ASSIGN_ID

属性配置没有太多可以说明的地方,都是一些web项目常见的配置,端口号,数据源连接和对象关系映射,目前所需的配置就是这些,后续有需要时再继续补充。

因为我们专注在项目的后端部分,所以前端的静态资源就直接使用黑马提供给我们的即可。注意SpringBoot默认的静态资源Handler规定了静态资源的defualt路径

1
"**By default, this handler serves static content from any of the \*/static, /public, /resources,\* and \*/META-INF/resources\* directories that are on the classpath**. "

如果静态资源放置于规定的路径下那么无需更多的配置即可直接在项目的context下访问,否则的话需要在application.yml下进行配置或者创建一个配置类。在ym中配置的key如下:

1
2
3
4
5
6
spring:
mvc:
static-path-pattern:
web:
resources:
static-locations:

其实这就是原来我们在SSM中配置的defultServlet,用于在DispatcherServlet前对静态资源请求进行处理

1
<mvc:default-servlet-handler/>  

这里为了熟悉配置类的使用我们选择使用配置类的方式进行配置。新建一个WebMvcConfig类,继承WebMvcConfigurationSupport然后重写其addResourceHandlers方法即可。

1
2
3
4
5
6
7
8
@Configuration
public class WebMvcConfig extends WebMvcConfigurationSupport {
@Override
protected void addResourceHandlers(ResourceHandlerRegistry registry) {
registry.addResourceHandler("/front/**").addResourceLocations("classpath:/static/front/");
registry.addResourceHandler("/backend/**").addResourceLocations("classpath:/static/backend/");
}
}

准备工作及环境搭建大概就是如此,启动application然后访问8088端口,可以看到静态资源已经可以访问了。Backend

3.后台系统登录功能

3.1需求分析

因为登陆功能相对比较简单,所以我们从登陆功能开始入手,需求分析大致遵循如下的步骤

1.页面原型分析

2.登陆页面分析(分析前端页面和后端约定的数据传输格式)

3.查看登陆请求信息,如请求的pattern请求发送的参数balabala

loginPage

4.查看对应的数据模型

3.2代码开发

创建实体类和表进行映射

创建对应的Mapper和Service及其实现{.tabset}

EmployeeMapper

直接继承BaseMapper即可

1
2
3
@Mapper
public interface EmployeeMapper extends BaseMapper<Employee> {
}
EmployeeService

继承IService

1
2
public interface EmployeeService extends IService<Employee> {
}
EmployeeServiceImpl

继承EmployeeService并实现ServiceImpl,注意泛型中要填入mapper和实体类

1
2
3
@Service
public class EmployServiceImpl extends ServiceImpl<EmployeeMapper, Employee> implements EmployeeService {
}

统一结果封装

由于前端在接受和处理来自后端的数据时希望能有一个统一的数据格式,所以在返回数据前,我们应该对任何格式的数据进行统一封装处理。

1
2
3
4
5
6
7
8
9
10
11
12
13
14
15
16
17
18
19
20
21
22
23
24
25
26
@Data
public class Result<T> {
private Integer code; //编码:1成功,0和其它数字为失败
private String msg; //错误信息
private T data; //数据
private Map map = new HashMap(); //动态数据

public static <T> Result<T> success(T object) {
Result<T> result = new Result<T>();
result.data = object;
result.code = 1;
return result;
}

public static <T> Result<T> error(String msg) {
Result result = new Result();
result.msg = msg;
result.code = 0;
return result;
}

public Result<T> add(String key, Object value) {
this.map.put(key, value);
return this;
}
}

编写对应的Controller

1
2
3
4
5
6
7
8
9
10
11
12
13
14
15
16
17
18
19
20
21
22
23
24
25
26
27
28
29
30
31
32
33
34
35
36
37
38
39
40
41
42
43
44
45
46
47
48
@Slf4j
// caution here, RestController 注解的value是用于为组件起一个逻辑名称
@RestController
@RequestMapping("/employee")
public class EmployeeController {

@Autowired
private EmployeeService employeeService;

/**
* create by: Xin Liu
* description: 这个控制器负责后台系统的登陆和登出功能
* create time: 2023/4/13 2:42 PM
*
* @param employee 封装前端页面请求传入的JSON数据
* @return fun.xinliu.entity.Employee
*/
@PostMapping("/login")
public Result<Employee> login(HttpServletRequest httpServletRequest, @RequestBody Employee employee) {

String username = employee.getUsername();
String password = employee.getPassword();
password = DigestUtils.md5DigestAsHex(password.getBytes());

LambdaQueryWrapper<Employee> lqw = new LambdaQueryWrapper<>();
lqw.eq(Employee::getUsername,username);
Employee emp = employeeService.getOne(lqw);

if(emp == null) {
return Result.error("该用户名或密码不正确");
}

if(!emp.getPassword().equals(password)){
return Result.error("该用户名或密码不正确");
}

if(emp.getStatus() == 0){
return Result.error("该账户已被禁用,请联系管理员");
}

// 为什么要记录登陆id?
// 为了后续校验当前访问请求是否已经登陆
httpServletRequest.getSession().setAttribute("employee", emp.getId());

return Result.success(emp);
}
}

登出功能

有登入就要有登出功能,登出功能相对较为简单,在EmployeeController中设置对应的pattern和相应的功能即可,注意登出时要清空当前会话域中保存的登陆Id

1
2
3
4
5
6
@PostMapping("/logout")
public Result<String> logout(HttpServletRequest request) {
// 清理session中保存的当前登陆的员工id
request.getSession().removeAttribute("employee");
return Result.success("退出成功");
}

至此我们就完成了后台管理系统登陆功能的基础开发,但是仔细回想一下,我们的登陆功能仍然有很大的缺陷,因为我们在访问后台的index.html页面时并没有对用户是否已经登陆进行校验, 合理的情况下,我们应该只允许成功登陆了的用户去访问我们的后台页面,并对来自未登陆用户的请求进行拦截,下面就让我们来完善这一功能。

完善登陆功能

登陆功能的完善可以通过过滤器和拦截器实现,这里我们使用过滤器,过滤器的使用需要新建一个过滤器类,并让其实现Filter接口。除此之外,我们还需要让Spring IOC容器将我们声明的过滤器类作为Bean纳入容器的管理之中,所以我们还需要使用@WebFilter该类,并在我们的SpringBootApplication上添加@ServletComponentScan注解。顾名思义,这个注解主要是通知SpringBoot开启对Servlet相关组件的扫描功能。

1
2
3
4
5
6
7
8
9
10
11
12
13
14
15
16
17
18
19
20
21
22
23
24
25
26
27
28
29
30
31
32
33
34
35
36
37
38
39
40
41
42
43
44
45
46
47
@WebFilter(filterName = "loginCheckFilter", urlPatterns = "/*")
@Slf4j
public class LoginCheck implements Filter {

public static final AntPathMatcher PATH_MATCHER = new AntPathMatcher();

@Override
public void doFilter(ServletRequest servletRequest, ServletResponse servletResponse, FilterChain filterChain) throws IOException, ServletException {
HttpServletRequest request = (HttpServletRequest) servletRequest;
HttpServletResponse response = (HttpServletResponse) servletResponse;

// 获取本次请求的URI
String requestURI = request.getRequestURI();

// 列出无需拦截的urls
String[] urls = new String[] {
"/employee/login", "/employee/logout", "/backend/**", "/front/**"
};

// 判断本次请求是否需要处理,如果符合exclude的pattern则直接放行
if(check(urls, requestURI)) {
filterChain.doFilter(request,response);
return;
}

// 否则判断是否已经登陆, 如果已经登陆则放行
if(request.getSession().getAttribute("employee") != null) {
filterChain.doFilter(request,response);
return;
}

// 如果未登陆,则写数据返回前端
// 注意这里写的数据需要和前端进行协作,要符合指定的数据交换规范
response.getWriter().write(JSON.toJSONString(Result.error("NOTLOGIN")));
}

// helper函数,负责进行校验
public boolean check(String[] urls, String requestURI) {
for (String s:urls) {
boolean match = PATH_MATCHER.match(s, requestURI);
if(match){
return true;
}
}
return false;
}
}

4. 添加员工

4.1 添加员工流程分析

通过查看原型页面和前端页面的代码我们可以发现,添加员工的主要流程如下:

1.前端页面发送ajax请求,将添加员工页面中输入的数据以JSON的格式提交到服务器

2.服务器端相应的handler方法接受数据调用业务层方法对数据进行保存

3.业务层方法调用数据访问层方法操作数据库保存数据

相应的数据模型,参数传递,调用函数和请求格式如下:

1
2
3
4
5
6
7
ruleForm : {
'name': '',
'phone': '',
'sex': '男',
'idNumber': '',
username: ''
}
1
2
3
4
5
6
7
8
9
10
11
12
13
14
15
16
17
18
19
20
21
22
23
24
25
26
27
28
29
30
31
32
33
34
35
36
37
38
39
40
41
42
43
44
45
46
47
48
49
50
51
52
submitForm (formName, st) {
this.$refs[formName].validate((valid) => {
if (valid) {
if (this.actionType === 'add') {
const params = {
...this.ruleForm,
sex: this.ruleForm.sex === '女' ? '0' : '1'
}
addEmployee(params).then(res => {
if (res.code === 1) {
this.$message.success('员工添加成功!')
if (!st) {
this.goBack()
} else {
this.ruleForm = {
username: '',
'name': '',
'phone': '',
// 'password': '',
// 'rePassword': '',/
'sex': '男',
'idNumber': ''
}
}
} else {
this.$message.error(res.msg || '操作失败')
}
}).catch(err => {
this.$message.error('请求出错了:' + err)
})
} else {
const params = {
...this.ruleForm,
sex: this.ruleForm.sex === '女' ? '0' : '1'
}
editEmployee(params).then(res => {
if (res.code === 1) {
this.$message.success('员工信息修改成功!')
this.goBack()
} else {
this.$message.error(res.msg || '操作失败')
}
}).catch(err => {
this.$message.error('请求出错了:' + err)
})
}
} else {
console.log('error submit!!')
return false
}
})
}
1
2
3
4
5
6
7
addEmployee (params) {
return $axios({
url: '/employee',
method: 'post',
data: { ...params }
})
}

4.2 后端处理

注意,后端handler方法接收到的JSON数据仅包含Employee中的部分字段,所以在添加到数据库之前我们还需要对其他字段进行填充处理,具体实现如下:

1
2
3
4
5
6
7
8
9
10
11
12
13
14
15
16
17
18
@PostMapping
public Result<String> save(HttpServletRequest httpServletRequest, @RequestBody Employee employee) {
log.info("新增员工: {}", employee.toString());

// 设置一个初始密码,需要使用md5进行加密
employee.setPassword(DigestUtils.md5DigestAsHex("123456".getBytes()));

employee.setCreateTime(LocalDateTime.now());
employee.setUpdateTime(LocalDateTime.now());

Long empId = (Long)httpServletRequest.getSession().getAttribute("employee");

employee.setUpdateUser(empId);
employee.setCreateUser(empId);

employeeService.save(employee);
return Result.success("新增员工成功");
}

此时我们的添加功能就大致做好了,不过还有一点需要注意的地方,那就是在数据表中,我们对用户的登陆id即username字段进行了唯一约束,如果我们重复添加具有相同username的员工数据会导致一个SQLIntegrityConstraintViolationException异常,异常的提示信息是”Duplicate entry ‘xxx’ for key ‘employee.idx_username’”,但是我们在前端页面只能看到500状态码对应的服务器内部错误,却得不到任何有关该错误的提示信息,这显然是不合理的。因此,我们有必要对这个可能抛出的异常进行处理。

4.3 统一全局异常处理

在JavaSE中我们学习了一些异常处理方式如try catch或者throw,但是一个项目中通常会有多处功能可能抛出不同类型的异常,如果我们都采用try catch的方式的就显得有些繁琐且不易于管理,因此在此处我们使用Spring框架提供的全局异常处理方式来统一进行异常处理。

首先我们在common包下新建一个GlobalExceptionHandler类,为其加上@ControllerAdvice注解,说明这是一个面向Controller的通知。Advice是AOP的核心概念,用于封装一个切面的所有属性,包括切入点和需要织入的切面逻辑。这里我们就使用这种机制来实现统一的异常管理。注意在ControllerAdvice注解的annotations属性中注明需要管理的注解类型。由于我们统一返回RESTful格式的结果所以注意添加@ResponseBody的注解(也可以使用复合注解@RestControllerAdvice)。

其次是创建相应的exceptionHandler方法,并使用@ExceptionHandler注明需要处理的异常类型。

1
2
3
4
5
6
7
8
9
10
11
12
13
14
15
16
17
18
@ControllerAdvice(annotations = {RestController.class, Controller.class})
@ResponseBody
@Slf4j
public class GlobalExceptionHandler {

@ExceptionHandler(SQLIntegrityConstraintViolationException.class)
public Result<String> exceptionHandler(SQLIntegrityConstraintViolationException ex) {
log.error(ex.getMessage());

if(ex.getMessage().contains("Duplicate entry")){
String[] strings = ex.getMessage().split(" ");
String msg = "用户名" + strings[2] + "已存在";
return Result.error(msg);
}

return Result.error("未知错误");
}
}

公共字段填充

问题分析

之前我们在新增员工和编辑员工时需要修改时间和修改人等字段,这些字段属于公共字段,很多表中都有这些字段,那么我们能不能在某个地方统一处理这些公共字段来简化开发呢?

答案是可以的,MyBatis Plus为我们提供了公共字段自动填充的功能,下面让我们来看看该怎么使用这一功能。

代码实现

公共字段填充功能的核心在于实现MetaObjectHandler这样一个元数据处理器,并且在需要自动填充的字段上使用@TableField注解,@TableField注解的fill值对应着触发自动字段填充的方法,比如Insert或者Insert&Update。

1
2
3
4
5
6
7
8
9
10
11
12
13
14
15
16
v@Data
public class Employee implements Serializable {

//省略了其他字段
@TableField(fill = FieldFill.INSERT)
private LocalDateTime createTime;

@TableField(fill = FieldFill.INSERT_UPDATE)
private LocalDateTime updateTime;

@TableField(fill = FieldFill.INSERT)
private Long createUser;

@TableField(fill = FieldFill.INSERT_UPDATE)
private Long updateUser;
}

其次,我们需要实现这样一个接口,在对应的方法中设定自动的数据填充,值得一提的是,因为在MetaObjectHandler的实现类中我们没有办法获取当前登陆的Session,继而无法直接获得当前Session中存储的登陆者的id,所以这里我们需要经由ThreadLocal来代为实现。

1
2
3
4
5
6
7
8
9
10
11
12
13
14
15
16
17
18
19
20
21
@Component
@Slf4j
public class MyMetaObjectHandler implements MetaObjectHandler {
@Override
public void insertFill(MetaObject metaObject) {
log.info("公共字段填充(create)...");
metaObject.setValue("createTime", LocalDateTime.now());
metaObject.setValue("updateTime", LocalDateTime.now());
//设置创建人id
metaObject.setValue("createUser", BaseContext.getCurrentId());
metaObject.setValue("updateUser", BaseContext.getCurrentId());
}

@Override
public void updateFill(MetaObject metaObject) {
log.info("公共字段填充(insert)...");
metaObject.setValue("updateTime", LocalDateTime.now());
//设置更新人id
metaObject.setValue("updateUser", BaseContext.getCurrentId());
}
}

已知客户端发送的每次http请求,对应的在服务端都会分配一个新的线程来处理,通过实验我们可以发现在处理过程中下面这些类中的方法都属于相同的一个线程:

  1. LocalCheekFilter中的doFilter方法
  2. EmployeeController中的update方法
  3. MyMetaObjectHandler中的updateFill方法

所以我们可以在doFilter方法中将登陆者的id存入ThreadLocal中,然后在后续的元数据处理器中进行填充,出于复用性的考虑,我们将这个过程抽取出来并封装到一个工具类中实现,具体的实现如下:

1
2
3
4
5
6
7
8
9
10
11
12
13
14
15
16
17
/**
* create by: Xin Liu
* description: 基于ThreadLocal的封装工具类,用于保存和获取当前登陆用户的id
* create time: 2023/4/14 4:00 PM
*/
public class BaseContext {

private static ThreadLocal<Long> threadLocal = new ThreadLocal<>();

public static void setCurrentId(Long id) {
threadLocal.set(id);
}

public static Long getCurrentId() {
return threadLocal.get();
}
}

LeetCode 122.买卖股票的最佳时机

贪心策略,只在第二天的价格高于今天时才买。

1
2
3
4
5
6
7
8
9
10
11
12
13
14
15
16
17
18
class Solution {
public int maxProfit(int[] prices) {

int profit = 0;
int diff = 0;

for (int i = 0; i < prices.length - 1; i++) {
diff = prices[i + 1] - prices[i];

// purchase iff next day's price is higher than today's
if (diff > 0){
profit += diff;
}
}

return profit;
}
}

LeetCode 50. 跳跃游戏

还挺有趣的,有点类似于脑筋急转弯。

1
2
3
4
5
6
7
8
9
10
11
12
13
14
15
16
17
18
19
class Solution {
public boolean canJump(int[] nums) {

if (nums.length == 1) {
return true;
}

int approach = nums[0];

for (int i = 0; i <= approach; i++) {
approach = Math.max(approach, i + nums[i]);
if(approach >= nums.length - 1) {
return true;
}
}

return false;
}
}

LeetCode 45. 跳跃游戏ii

这道题的贪心解法特别的巧妙,巧妙的点在于它利用了当前范围内的最大可能覆盖范围进行了贪心,curRange意味着当前跳跃次数范围内的边界,超出这个边界则意味着步数的增加。遍历的终点在于nums.length - 2, 因为题目已经给定,必然存在能跳跃到终点的解存在,那么这个最后一站的最大可能性就是nums.length - 2。

1
2
3
4
5
6
7
8
9
10
11
12
13
14
15
16
17
18
19
20
21
22
23
24
25
26
27
28
29
class Solution {
public int jump(int[] nums) {

if (nums.length == 1) {
return 0;
}

int curRange = 0;
int potential = 0;
int res = 0;

// here our traverse stops at i == nums.length -2
// if as this case, i == curRange, it naturally
// need one more step, and res would increase by 1
// else, it means that the curRangg has already covered
// the nums.length - 1
for (int i = 0; i < nums.length - 1; i++) {

potential = Math.max(potential, i + nums[i]);

if (i == curRange) {
res++;
curRange = potential;
}
}

return res;
}
}

今天开始贪心专题的算法训练,用Carl的话使用贪心算法的问题一般遵循如下思路,想清楚局部最优,想清楚全局最优,感觉局部最优是可以推出全局最优,并想不出反例,那么就试一试贪心(代码随想录)

LeetCode 455.分发饼干

1
2
3
4
5
6
7
8
9
10
11
12
13
14
15
16
17
18
19
20
21
22
class Solution {
public int findContentChildren(int[] g, int[] s) {
Arrays.sort(g);
Arrays.sort(s);

int index = s.length - 1;
int num = 0;

for (int i = g.length - 1; i >= 0; i--) {

if (index < 0) {
break;
}

if (s[index] >= g[i]) {
num++;
index--;
}
}
return num;
}
}

LeetCode 376.摆动序列

摆动序列还挺巧妙的,有很多细节需要注意,prevDiff的更新时机,平坡,etc.

1
2
3
4
5
6
7
8
9
10
11
12
13
14
15
16
17
18
19
20
21
22
23
24
25
26
27
28
29
30
31
32
33
class Solution {
public int wiggleMaxLength(int[] nums) {

// corner case, as described, if there are only 1 element return 1
// if there are two elements and they are not equal, return 2
if (nums.length == 1) {
return 1;
}else if (nums.length == 2) {
if (nums[0] != nums[1]) {
return 2;
}
return 1;
}

// result is initialized as 1, as the rightest one is always regarded as a waggle
int result = 1;

//
int prevDiff = 0;
int curDiff = 0;

for (int i = 0; i < nums.length - 1; i++) {
curDiff = nums[i + 1] - nums[i];
if (prevDiff >= 0 && curDiff < 0 || prevDiff <=0 && curDiff > 0) {
result++;
// update prevDiff only when a waggle is found, and recordsits direction
prevDiff = curDiff;
}
}

return result;
}
}

LeetCode 53. 最大子数组和

贪心就贪心在,如果当前累计的值小于0,那么它对于全局的最大sum就是负贡献,就把它drop掉。

1
2
3
4
5
6
7
8
9
10
11
12
13
14
15
16
17
18
19
20
21
22
23
class Solution {
public int maxSubArray(int[] nums) {

int sum = Integer.MIN_VALUE;
int temp = 0;

for (int i = 0; i < nums.length; i++) {
temp += nums[i];

// do the comparasion first, and initialize sum to minimum to avoid no result recorded
sum = temp > sum ? temp : sum;

// temp is a temporaray record of local sum, if it is less than zero, then it makes no sense
// to further sum
if (temp < 0) {
temp = 0;
}
}

return sum;

}
}

今天主要回顾了一下回溯算法专题,该专题主要有:

  • 组合问题
  • 切割问题
  • 子集问题
  • 排列问题
  • 棋盘问题

这样几类,应该注意组合和排列的区别,以及子集问题和组合/排列问题的区别。 组合和排列的主要区别在于元素顺序是否对答案集有所影响上,比如对给定数组[1, 2]的组合为[1,2]但其排列却有[1,2], [2,1]两组。而子集问题和排列组合问题的区别则在于,排列组合问题通过递归和回溯收集整个递归树形结构的叶子节点,而子集问题则要收集沿途的所有节点。分割问题其实是组合问题的一种变体,但是要注意对字符串的操作以及递归的结束条件。

回溯的一般步骤有:

确定递归函数传入参数

确定递归终止条件

遍历处理单层节点,递归,回溯(撤销结果)

剪枝操作:

注意由于回溯法的暴力程度很高,所以在一般情况下能剪枝时应尽量剪枝,以降低搜索的时间开销。

几个值得讨论的点:

1.回溯撤销结果撤销的是本节点加入的结果,每个节点在完成自己的单层操作后都将自己从结果集中删除

2.树枝剪枝和树层剪枝的问题,在排列和组合问题中经常需要对结果进行去重,如果一个元素在同层已经使用过,那么对于相同的同层元素而言,没有继续遍历的需要

LeetCode 491.递增子序列

这道题和leetcode 90.子集有类似之处,但是有一些tricky的细节需要考虑,这是第一版,有些瑕疵。

1
2
3
4
5
6
7
8
9
10
11
12
13
14
15
16
17
18
19
20
21
22
23
24
25
26
27
28
29
30
31
32
33
34
35
36
37
38
39
40
41
42
43
44
45
46
47
48
49
50
51
52
53
54
55
56
57
58
59
60
class Solution {

private List<List<Integer>> ans = new LinkedList<>();
private Set<List<Integer>> set = new HashSet<>();
private List<Integer> path = new LinkedList<>();

public List<List<Integer>> findSubsequences(int[] nums) {

backtracking(nums, 0);
ans.addAll(set);
return ans;

}

private void backtracking (int[] nums, int startIndex) {

// as the minimum valid sequence contains at least two elements, thus
// add those path whose length is greater than 1
if (path.size() > 1) {
set.add(new LinkedList<>(path));
}


for (int i = startIndex; i < nums.length; i++) {

/*
* actually this kind of remove duplicate is non-sense
* as it only function when the given array is like [4 6 7 7]
* if it is changed to [4 7 6 7] it still causes duplicates
*/

// rule out duplicate elements in same level
if (i > startIndex && nums[i] == nums[i - 1]){
continue;
}

// we are not sure whether this time of calling would
// add a element or not ,thus record the previous size
int recordPathSize = path.size();

// for the topest level elements, directly add it
if (path.size() == 0) {
path.add(nums[i]);
}else if (path.size() > 0) {
// if current element is greater and equals to last added element
if ( nums[i] >= path.get(path.size() - 1)){
path.add(nums[i]);
}
}

// recursively call this func
backtracking(nums, i + 1);

// if we do add elements into the path, remove it
if (path.size() > recordPathSize) {
path.remove(path.size() - 1);
}
}
}
}

Version 2:

注意remove处,一开始我试图使用条件判断来判断之前的语句是否成功添加了元素,然后根据结果决定是否remove最后的元素,但是这样太繁琐了, 而且很容易出错,所以最好使用其相反的逻辑,去除所有不可能的枝干。

1
2
3
4
5
6
7
8
9
10
11
12
13
14
15
16
17
18
19
20
21
22
23
24
25
26
27
28
29
30
31
32
33
34
35
36
37
38
39
40
41
class Solution {

private List<List<Integer>> ans = new LinkedList<>();
private List<Integer> path = new LinkedList<>();

public List<List<Integer>> findSubsequences(int[] nums) {

backtracking(nums, 0);
return ans;

}

private void backtracking (int[] nums, int startIndex) {

// when traversing all the tree, add those path whose length is equal
// and greater than 2
if (path.size() > 1) {
ans.add(new LinkedList<>(path));
}

// number [-100, 100] maps to array ranged [0, 200]
// records whether this num has been used
int[] used = new int[201];

for (int i = startIndex; i < nums.length; i++) {

// if path is not empty and elment is less than last num or it has been used, skip
if ( (!path.isEmpty() && nums[i] < path.get(path.size() - 1)) || used[nums[i] + 100] == 1 ) {
continue;
}

path.add(nums[i]);
used[nums[i] + 100] = 1;

backtracking(nums, i + 1);

// avoid uncertain backtrack, ensure that whichever approach here must be successful add
path.remove(path.size() - 1);
}
}
}

LeetCode 46.全排列

使用一个标记数组是最便捷的方法

1
2
3
4
5
6
7
8
9
10
11
12
13
14
15
16
17
18
19
20
21
22
23
24
25
26
27
28
29
30
31
32
33
34
35
class Solution {

private List<List<Integer>> ans = new LinkedList<>();
private List<Integer> path = new LinkedList<>();
private boolean[] used;

public List<List<Integer>> permute(int[] nums) {
used = new boolean[nums.length];
backtracking(nums);
return ans;
}

private void backtracking (int[] nums) {

// exits
if (path.size() == nums.length) {
ans.add(new LinkedList<>(path));
}

for (int i = 0; i < nums.length; i++) {

if(used[i]) {
continue;
};

path.add(nums[i]);
used[i] = true;

backtracking(nums);

path.remove(path.size() - 1);
used[i] = false;
}
}
}

LeetCode 47.全排列ii

注意去重的效率问题,很巧妙的,如果将判断条件设置为(i > 0 && used[i - 1] && nums[i] == nums[i - 1]) 那么对于[1 1 1 1 ]这样的数组,前三个元素的搜索子树都是无效遍历,如果将其设置为(i > 0 && !used[i - 1] && nums[i] == nums[i - 1]) 这样的话,在第一个1的子树搜索完后,后续三个子树都不会继续搜索,这样效率得到了极大的提高

1
2
3
4
5
6
7
8
9
10
11
12
13
14
15
16
17
18
19
20
21
22
23
24
25
26
27
28
29
30
31
32
33
34
35
36
37
38
39
40
41
42
43
44
45
class Solution {

private List<List<Integer>> ans = new LinkedList<>();
private List<Integer> path = new LinkedList<>();
private boolean[] used;

public List<List<Integer>> permuteUnique(int[] nums) {
Arrays.sort(nums);
used = new boolean[nums.length];
backtracking(nums);
return ans;
}

private void backtracking (int[] nums) {

// exits
if (path.size() == nums.length) {
ans.add(new LinkedList<>(path));
}

for (int i = 0; i < nums.length; i++) {

// here is pruning but in a branch level
// as used[i - 1] = true means we are in the branch of nums[i -1]
// which is less efficient than directly remove this whole branch

// if(used[i] || (i > 0 && used[i - 1] && nums[i] == nums[i - 1])) {
// continue;
// };

// here is the pruning in level level (the same level on the tree)
if(used[i] || (i > 0 && !used[i - 1] && nums[i] == nums[i - 1])) {
continue;
};

path.add(nums[i]);
used[i] = true;

backtracking(nums);

path.remove(path.size() - 1);
used[i] = false;
}
}
}

LeetCode 93.复原ip地址

和分割字符串有一起同工之妙,剪枝还能再优化。

1
2
3
4
5
6
7
8
9
10
11
12
13
14
15
16
17
18
19
20
21
22
23
24
25
26
27
28
29
30
31
32
33
34
35
36
37
38
39
40
41
42
43
44
45
46
47
48
49
50
51
52
53
54
55
56
57
58
59
60
61
62
class Solution {

List<String> ans = new LinkedList<>();
List<String> path = new LinkedList<>();

public List<String> restoreIpAddresses(String s) {
if (s.length() > 12) {
return ans;
}
backtracking(s, 0, 0);
return ans;
}

private void backtracking (String s, int startIndex, int cnt) {

// recursion exits
if (cnt == 4) {
if (startIndex >= s.length()) {
String str = path.stream().collect(Collectors.joining("."));
ans.add(str);
}
return;
}

for (int i = startIndex; i < s.length() - (4 - path.size()) + 1; i++) {
// if the subString from [startIndex, i] is valid
String subStr = s.substring(startIndex, i + 1);
if (isValidIP(subStr)){

path.add(subStr);
}else {
continue;
}
backtracking(s, i + 1, cnt + 1);
path.remove(path.size() - 1);
}
}


// used to check the given string is valid ip or not
private boolean isValidIP (String str) {

if (str != null) {

if (str.length() > 3) {
return false;
}

int num = Integer.valueOf(str) ;

if (num < 0 || num > 255) {
return false;
}

if (str.length() > 1 && str.charAt(0) == '0') {
return false;
}
return true;
}
return false;
}
}

LeetCode 78.子集

这道题一开始想的复杂了,一开始把它视为77组合问题的变体,求k = 0, k = nums.length 的组合,但是这样其实重复遍历了很多节点。其实换一个角度思考的话,把整颗树遍历过程中的每个节点都记录下来最后返回即可。

1
2
3
4
5
6
7
8
9
10
11
12
13
14
15
16
17
18
19
20
21
22
23
24
25
26
27
28
29
30
31
32
33
34
35
36
37
38
39
40
41
42
43
44
45
46
47
48
49
50
51
52
53
54
55
class Solution {

List<List<Integer>> res = new LinkedList<>();
List<Integer> path = new LinkedList<>();

// high complexity
// public List<List<Integer>> subsets(int[] nums) {

// for (int i = 0; i <= nums.length; i++) {
// backtracking1(nums, i, 0);
// }

// return res;
// }

// private void backtracking1 (int[] nums, int k, int index) {
// // recursion exits
// if (path.size() == k) {
// List<Integer> sub = new LinkedList<>();
// sub.addAll(path);
// res.add(sub);
// return;
// }

// // this is to remove those unvalid recursion
// for (int i = index; i < nums.length - (k - path.size()) + 1; i++) {
// path.add(nums[i]);
// backtracking(nums, k, i + 1);
// path.remove(path.get(path.size() - 1));
// }
// }


public List<List<Integer>> subsets(int[] nums) {
helper(nums, 0);
return res;
}

private void helper ( int[] nums, int startIndex) {

// add very node during traverse
res.add(new LinkedList<>(path));

if (startIndex >= nums.length) {
return;
}

for (int i = startIndex; i < nums.length; i++) {

path.add(nums[i]);
helper(nums, i + 1);
path.remove(path.size() - 1);
}
}
}

LeetCode 90.子集-ii

没什么新奇的东西,数组有重复元素所以要先排列,在添加元素到path前判断是否已经基于相同元素遍历过一次了。

1
2
3
4
5
6
7
8
9
10
11
12
13
14
15
16
17
18
19
20
21
22
23
24
25
26
27
28
29
class Solution {

List<List<Integer>> ans = new LinkedList<>();
List<Integer> path = new LinkedList<>();

public List<List<Integer>> subsetsWithDup(int[] nums) {

// as there are duplicates elements, thus we need to sort the array first
Arrays.sort(nums);
backtracking(nums, 0);
return ans;
}

private void backtracking (int[] nums, int startIndex) {
ans.add(new LinkedList<>(path));

for (int i = startIndex; i < nums.length; i++) {

if (i > startIndex && nums[i] == nums[i - 1]) {
continue;
}else {
path.add(nums[i]);
}

backtracking(nums, i + 1);
path.remove(path.size() - 1);
}
}
}

LeetCode 39.组合总和

和216组合总和iii有相似之处,唯一的区别就是给定了candidates数组以及允许数字重复使用,只需要稍微调整一下下层递归的起始index即可。

1
2
3
4
5
6
7
8
9
10
11
12
13
14
15
16
17
18
19
20
21
22
23
24
25
26
27
28
29
30
31
32
33
34
35
36
class Solution {

private List<List<Integer>> ans = new LinkedList<>();
private List<Integer> path = new LinkedList<>();

public List<List<Integer>> combinationSum(int[] candidates, int target) {
backtracking(target, candidates, 0);
return ans;
}

private void backtracking (int target, int[] candidates, int startIndex) {

// if target is less than 0, exits
if (target < 0) {
return;
// if find a successful combo, add it into ans
}else if (target == 0) {
List<Integer> combo = new LinkedList<>();
combo.addAll(path);
ans.add(combo);
}


for (int i = startIndex; i < candidates.length; i++) {
path.add(candidates[i]);

// note here, by seting the startIndex to i , it means that
// the next element can still start with candidates[i]
// this allows path like [2,2,3]
// but at the mean time, it prevents the path like [3,2,2]
// and through this way it removes some duplicates path
backtracking(target - candidates[i], candidates, i);
path.remove(path.size() - 1);
}
}
}
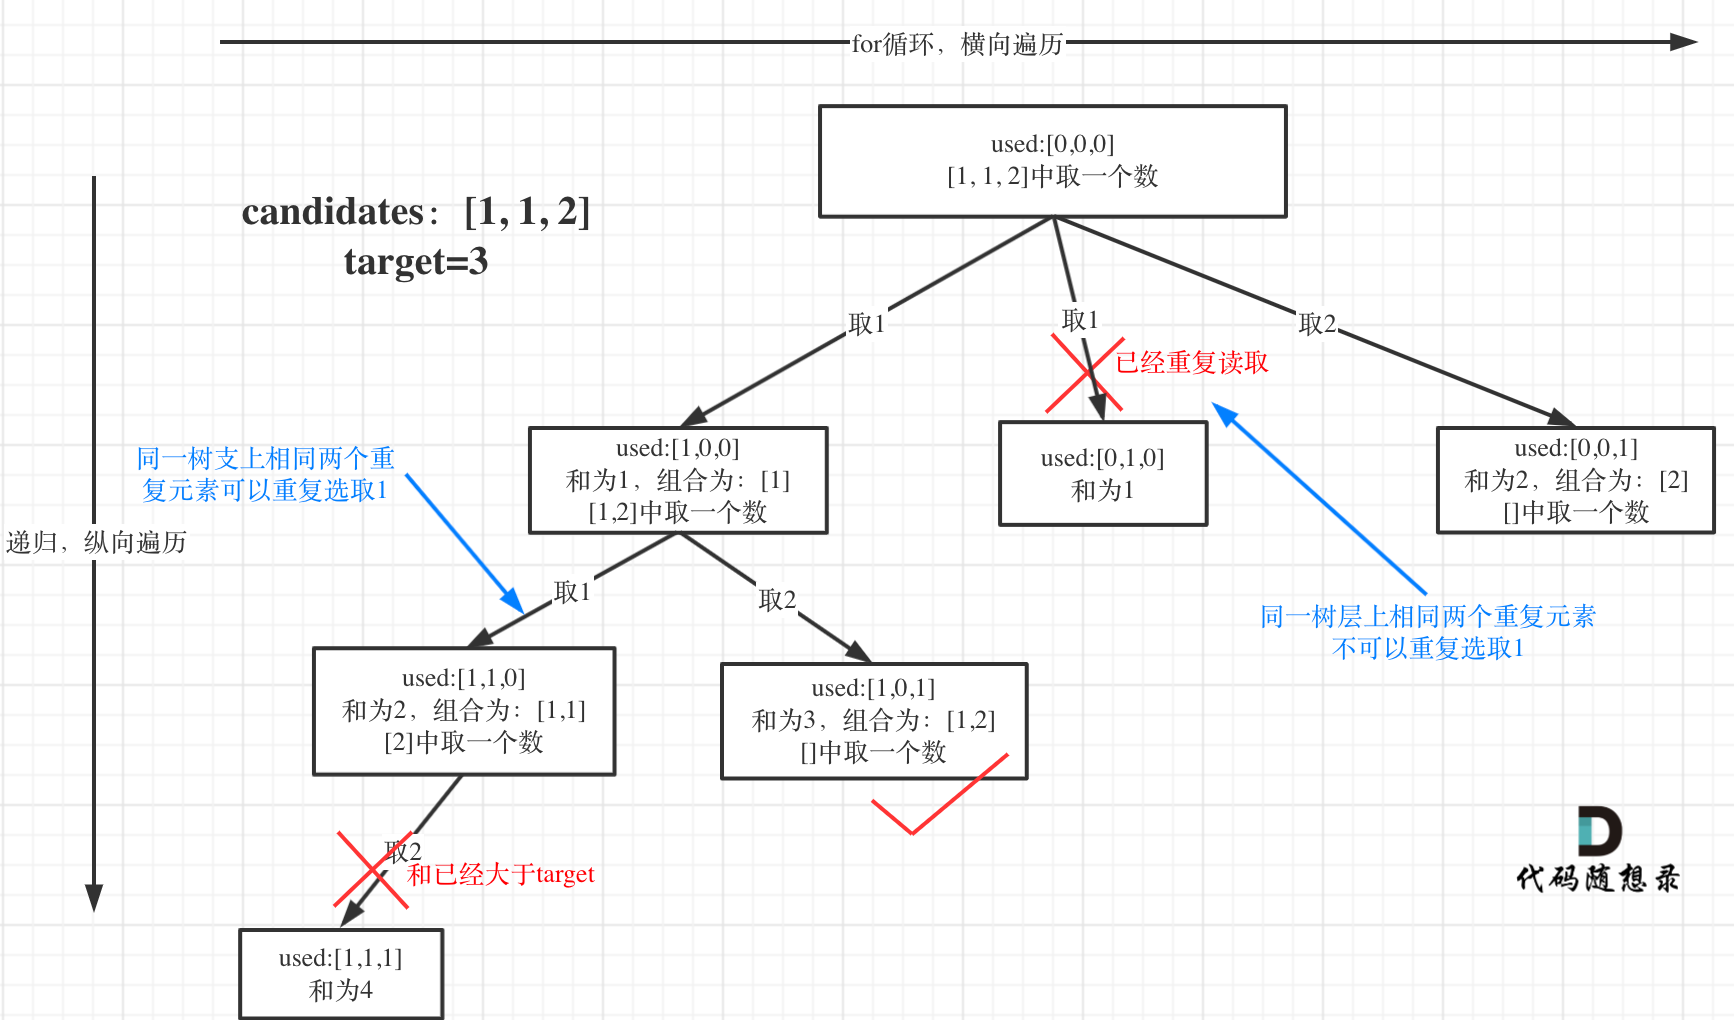
LeetCode 40 组合总和ii

这道题的核心在于去重,注意我们的目的是同层遍历去重,所以通过检验当前元素是否是在同层上与左侧元素相同即可。

图片1

(转载自代码随想录)

1
2
3
4
5
6
7
8
9
10
11
12
13
14
15
16
17
18
19
20
21
22
23
24
25
26
27
28
29
30
31
32
33
34
35
36
37
38
39
40
41
class Solution {

private List<List<Integer>> ans = new LinkedList<>();
private List<Integer> path = new LinkedList<>();

public List<List<Integer>> combinationSum2(int[] candidates, int target) {
Arrays.sort(candidates);

backtracking(candidates, target, 0);

return ans;
}

private void backtracking(int[] candidates, int target, int index) {

if (target < 0) {
return;
// if find a successful combo, add it into ans
}else if (target == 0) {
List<Integer> combo = new LinkedList<>();
combo.addAll(path);
ans.add(combo);
}

for (int i = index; i < candidates.length; i++) {

// we need to avoid the duplicates in the same level for instance,
// if we are chooseing the first num and the candidates is [1, 1, 1, 2]
// then the second 1 would result in duplicates
// this num is same as its left one && they are in the same level
// then skip it
if (i > index && candidates[i] == candidates[i - 1]){
continue;
}

path.add(candidates[i]);
backtracking(candidates, target - candidates[i], i + 1);
path.remove(path.size() - 1);
}
}
}

LeetCode 131.分割回文串

切割问题,和组合问题有异曲同工之妙,但是稍微有点难想,主要是对分割字符串的操作不是很熟悉。

1
2
3
4
5
6
7
8
9
10
11
12
13
14
15
16
17
18
19
20
21
22
23
24
25
26
27
28
29
30
31
32
33
34
35
36
37
38
39
40
41
42
43
44
45
46
47
48
49
50
51
52
53
54
55
56
57
58
class Solution {

private List<List<String>> ans = new LinkedList<>();
private List<String> path = new LinkedList<>();

public List<List<String>> partition(String s) {
backtracking(s, 0);
return ans;

}

// for any String such as "aabbccd"
// start with "a" then "aa", then "aab"
private void backtracking (String s, int startIndex) {

// if we succeed to split the whole string, return
if (startIndex >= s.length()) {
List<String> combo = new LinkedList<>();
combo.addAll(path);
ans.add(combo);
return;
}

for (int i = startIndex; i < s.length(); i++) {

if (isPalindrome(s, startIndex, i)) {
path.add(s.substring(startIndex, i + 1));
}else {
continue;
}

backtracking(s, i + 1);
path.remove(path.size() - 1);

}

}

// test if a sub string is palindrome from startIndex to the endIndex
private boolean isPalindrome (String s, int startIndex, int endIndex) {
int i = startIndex;
int j = endIndex;

boolean ans = true;

while ( i <= j) {
if (s.charAt(i) == s.charAt(j)){
i++;
j--;
}else {
ans = false;
break;
}
}

return ans;
}
}

LeetCode 216.组合总和-iii

注意可以剪枝,后续再研究.

1
2
3
4
5
6
7
8
9
10
11
12
13
14
15
16
17
18
19
20
21
22
23
24
25
26
27
28
29
30
31
32
33
34
35
36
37
38
39
40
class Solution {
public List<List<Integer>> combinationSum3(int k, int n) {
List<List<Integer>> res = new LinkedList<>();
List<Integer> path = new LinkedList<>();
backtracking(res, path, k, n, 1);
return res;
}

private void backtracking (List<List<Integer>> res, List<Integer> path, int k, int n, int index) {

// recursion exits if size == k && sum == n
if (path.size() == k && getSum(path) == n) {
List<Integer> combo = new LinkedList<>();
combo.addAll(path);
res.add(combo);
}

// traverse the [index, 9]
for (int i = index; i < 10; i++) {
// add this value into path
path.add(i);

// traverse the right side numbers
backtracking(res, path, k, n, i + 1);

// backtrack here
path.remove(path.get(path.size() - 1));
}

}

// a helper method
private int getSum ( List<Integer> list) {
int sum = 0;
for (Integer integer : list) {
sum += integer;
}
return sum;
}
}

LeetCode 17.电话号码的字母组合

还有一些小的优化可以做,比如可以把hashmap换成数组。

1
2
3
4
5
6
7
8
9
10
11
12
13
14
15
16
17
18
19
20
21
22
23
24
25
26
27
28
29
30
31
32
33
34
35
36
37
38
39
40
41
42
43
44
45
46
47
48
49
50
51
52
53
54
55
56
class Solution {
public List<String> letterCombinations(String digits) {
Map<Character, String> map = new HashMap<>();
map.put('2', "abc");
map.put('3', "def");
map.put('4', "ghi");
map.put('5', "jkl");
map.put('6', "mno");
map.put('7', "pqrs");
map.put('8', "tuv");
map.put('9', "wxyz");

List<String> ans = new LinkedList<>();
List<Character> path = new LinkedList<>();

if (digits.length() > 0) {
backtracking(map, ans, path, digits);
}

return ans;

}

private void backtracking (Map<Character, String> map, List<String> ans, List<Character> path, String digits) {

// recursion exits if the length approach its target
if (path.size() == digits.length()) {

StringBuffer sb = new StringBuffer();

for (Character character : path) {
sb.append(character);
}

ans.add(new String(sb));
return;
}

char digit = digits.charAt(path.size());
String str = map.get(digit);

for (int i = 0; i < str.length(); i++) {
char c = str.charAt(i);
path.add(c);

backtracking(map, ans, path, digits);

// false way
// path.remove(path.get(path.size() - 1));

// correct one
path.remove(path.size() - 1);
}

}
}

LeetCode 77.组合

backtracking专题第一题,一开始对递归出口的处理没有特别好,一开始使k在递归过程中随着递归的深入不断减少遇到了一些问题,有点麻烦,直接使用k == path.size 判断就好了。

1
2
3
4
5
6
7
8
9
10
11
12
13
14
15
16
17
18
19
20
21
22
23
24
25
26
27
28
29
30
31
class Solution {
public List<List<Integer>> combine(int n, int k) {
List<List<Integer>> ans = new LinkedList<>();
List<Integer> path = new LinkedList<>();
myCombine(ans, path, n, k, 1);
return ans;
}

// for instance, n = 20, K = 3,
// the tartet ans is the combination of every 2 elements in [1, 20]
private void myCombine (List<List<Integer>> ans, List<Integer> path, int n, int k, int index) {

// recursion exits
if (path.size() == k) {
List<Integer> combine = new LinkedList<>();
combine.addAll(path);
ans.add(combine);
return;
}

// this is to remove those unvalid recursion
for (int i = index; i <= n - (k - path.size()) + 1 ; i++) {
path.add(i);
myCombine(ans, path, n, k, i + 1);
path.remove(path.get(path.size() - 1));

}

}

}

LeetCode 669. 修剪二叉搜索树

依照指定的范围 [low, high] 修剪一颗二叉搜索树,删除所有在范围以外的节点

1
2
3
4
5
6
7
8
9
10
11
12
13
14
15
16
17
18
19
20
21
22
23
24
25
26
class Solution {
public TreeNode trimBST(TreeNode root, int low, int high) {

if (root == null) {
return null;
}

// as this is a BST, if root's val is larger than high
// then all the right side nodes should be removed
if (root.val > high) {
return trimBST(root.left, low, high);
}

// the same with the left side
if (root.val < low) {
return trimBST(root.right, low, high);
}

// else, it means that root is within the target range
// thus trim its child nodes
root.left = trimBST(root.left, low, high);
root.right = trimBST(root.right, low, high);
return root;

}
}

LeetCode 108. 将有序数组转化为二叉搜索树

思路并不复杂,有序数组构建二叉搜索树,首先找到中间节点, 然后用左侧部分构建左树, 右侧构建右树,注意在递归的过程中维持循环不变量——左闭右开区间。

1
2
3
4
5
6
7
8
9
10
11
12
13
14
15
16
17
18
19
20
21
22
23
24
25
26
class Solution {
public TreeNode sortedArrayToBST(int[] nums) {
// as I do not wanna change the array itself thus I choose to use to helper
// function and express the range
return buildBST(nums, 0, nums.length);
}


// build the tree and return the root node in range [startIndex, endIndex)
private TreeNode buildBST (int[] nums, int startIndex, int endIndex){

if (startIndex >= endIndex) {
return null;
}

// pre-order
int mid = (endIndex - startIndex) / 2 + startIndex;
TreeNode root = new TreeNode (nums[mid]);

// maitain the invirants- the range [startIndex, endIndex)
root.left = buildBST(nums, startIndex, mid);
root.right = buildBST(nums, mid + 1, endIndex);
return root;

}
}

LeetCode 538.把二叉搜索树转换为累加树

一开始没注意从rightmost节点开始遍历可以一次遍历完成所有操作

1
2
3
4
5
6
7
8
9
10
11
12
13
14
15
16
17
18
19
20
21
22
23
24
25
26
27
28
29
30
31
32
33
34
class Solution {
private int temp = Integer.MIN_VALUE;

public TreeNode convertBST(TreeNode root) {

myConvertTree(root);
return root;
}


private void myConvertTree (TreeNode root) {

if (root == null) {
return;
}

// reflect the target tree, we can find that it starts counting
// with the right node, then root node
// and then the left node, thus we can traverse the tree in a variant in-order
// i.e. right mid left
myConvertTree(root.right);

// use a temp variable to record the updated value of the prev node thus we can
// change all the nodes in one traverse
if (temp != Integer.MIN_VALUE) {
root.val += temp;
}

temp = root.val;

myConvertTree(root.left);
}

}